Showing posts with label essence. Show all posts

Monday, September 23, 2013

Essence Sparkle Sand Effect - Hey, Nude!

Hey guys!

A while ago I posted about Essence's attempt at a 'rough' polish. I thought it was going to be a textured polish like the Liquid Sands we all know but I was slightly disappointed when I found out that wasn't the case. I've been dying to try out a textured polish but I haven't been able to get my hands on one yet.

Well, Essence recently came with actual textured polishes! I was very excited to try them so I picked them up. They come in three different colours and today I'll be showing you the nude variant.


Essence Hey, Nude! Is the Sparkle Sand Effect in an elegant nude colour. The base is a very light pink with silver shimmer and a few different sizes of silver glitter in it. As you can see, there is some VNL. It didn't bother me on my short nails so it's up to you if you like it or not. 

In the picture I'm wearing three layers, and let me tell you... if you are in a hurry and have to do your nails quickly, this is possibly the WORST polish to pick at that moment.My first attempt at swatching this polish failed horribly because every coat takes ages to dry. I probably waited 15~20 minutes for each coat to dry, and even then it stayed squishy on my nails and I got dents everywhere. :( It may just be this colour though, because I tried one of the other Sparkle Sands and it was absolutely fine.


If you have all the time in the world and don't mind having to wait a long time for your nails to try... this is a very pretty polish to have. I think it looked very elegant on my little nubs. I can't say anything about the wear though, because I took it off after a few hours... very, very disappointing.

Thursday, June 13, 2013

Essence - Mashed Berries

Hey guys! Today I have a really awesome nail polish to show you that reminds me of summer and smoothies. It was actually part of a collection from last year, but that doesn't make me love it any less now.


This is Essence Mashed Berries, which was obtainable from their Fruity collection from last year. There were three different polishes that looked similar to this one, but this is my favourite. They unfortunately have no names on the bottles, but I do know that this one is named Mashed Berries.

It's a very sweet pink creme with purple glitter in it. Because the glitter is tiny and dark, the polish totally resembles a smoothie. It looks delicious! It's not that noticable in my pictures, but the glitter does sparkle, you just need to be looking at it from the right angle. 


I used three thin coats for full opacity and I had no problems applying it. I'm very happy with this polish. It makes me want to eat my nails. :D

Tuesday, June 04, 2013

Essence Floral Grunge - Black To The Roots

Hey everyone! I already showed you Madly Purpled, the matte polish of Essence's Floral Grunge collection, and today I'll be showing you the other polish I got.


This is Black To The Roots. It is called 'The Rough' one of this collection which is why I was very curious about it. With all the hype around textured polishes nowadays I thought that this might be Essence's version of the trend.

And it is. Sort of! Black To The Roots is a dark gray base with gritty silver glitter in it. This is definitely not a textured polish like the Liquid Sand collection for example. But there is texture in it, as you can see in the pictures. The base dries up with a sort of matte, almost rubbery finish, while the glitter leaves a gritty texture. I'm not sure if I like it or not, but it is definitely interesting.


The application was pretty bad. The formula is kind of weird and streaky, making it difficult to paint even coats. I used two coats for full opacity and no top coat to show off the grittiness. I definitely like Madly Purpled a lot more!

What do you think of this polish?

Tuesday, May 28, 2013

Blue fan brush mani

Hey guys!

So, I have had a set of nail art brushes for a while now and I realized I had never actually used the fan brush that was in it. I was unsure what to do with it until I saw some tutorials popping up. Turns out that you are able to create very cool looking manicures that are simple to do. Perfect for me!


After some fiddling around with colours this is what I came up with. Pretty cool, huh? Personally, I'm very fond of the effects that the fan brush gives. And like I said, it's extremely simple.

What I did was start out with two coats of a simple black creme, in this case Essence Black is Back. I left it alone until it was completely dry which is when I grabbed my fan brush. I made the hairs of the brush slightly wet and seperated them a bit. Then I dipped the tips in Catrice Blue's Brother. And swiped the brush across my nail.


You can kinda experiment with the brush. You can swipe over your nails just once, for example. But for most of my nails I did two strokes: one starting from the left side, to the middle of my nail, and the other from the right. It created this nice effect that looks different on each nail.

I only used one colour this time, but I can see this being very interesting with two colours! What do you think?

Thursday, May 23, 2013

Essence Floral Grunge - Madly Purpled

 Hey guys! Today I have a nail polish from the Essence Floral Grunge collection. I bought two polishes from this collection, a matte and a 'textured' one. I'll be writing about the matte today.


This is Madly Purpled. It's decribed as 'the matt'. Matt? I've never seen it spelled like that. Maybe it was an intentional mistake? Stuff like that bothers me! :P Anyway, this polish is quite pretty. It's a pretty dark and gray-ish lavender which makes it, in my opinion, a very classy colour. I really liked the way it looked with my skin tone. It also has a nice subtle silver shimmer.


As you can see however, it can't really be classified as a 'true' matte nail polish. I'd say it dries up to more of a suede finish. If you don't like that, you can slap a topcoat on top of it and you'll have a pretty shiny lavender with noticable shimmer. I actually liked it like this.

The formula was good too. I used two coats and I had no problems applying it!

What do you think of this polish? 

Sunday, May 19, 2013

Lavender Stamping and a new layout!

Hey guys! I am back from my little break. I caught a nasty cold so it took a bit longer than I wanted to. I'm still not completely better but I did feel like fiddling around with nail art stuff, AND my blog layout. What do you think? I mainly wanted to change it so I could actually respond to the comments I get. I was starting to feel bad for not being able to interact with you guys properly. I hope you like the new layout. :)

So, I decided to try my hand  at stamping once again, since it had been a while. :D


Okay, my colour and plate choice was a bit random this time, haha. And as you can see, my stamping skills could really use some improvement. But keep in mind this is only about my fifth time doing a full manicure with stamping and that I have a lot to learn!

The base colour is NYC Lavender Cupcake, one of my favourite cremes. Since I don't have any Konad polishes (they have been on my wish list for a while now...) I rummaged through my stash trying to find a decent polish to stamp with. I ended up with Essence Unexpected Galaxy which is actually one of their colour changing nail polishes. I knew it was an opaque polish, though I wasn't sure what it was going to look like after I applied my top coat, haha Fortunately, it wasn't too bad!


I ended up stamping an image from one of my Born Pretty Store plates. This one is from stamping plate m65 and I thought it looked pretty groovy.

So what do you think? How bad of an attempt is this? Also, feel free to share any tips and tricks you might have for me!

Wednesday, May 01, 2013

Essence - Miss Universe

Hey everyone! Geez, it's may already. Time is going so fast. Today I'm showing you another nail polish by Essence and I believe this one has been pretty popular recently. I also got it as a gift from my boyfriend, so I thought today would be a good day to post this, since it's his birthday today!


Miss Universe is gorgeous! It has a dark base, full with blue and green shimmer. The blue is much more noticable, however. In the bottle it looks like a duochrome, but don't let that fool you - it really isn't. That doesn't make it any less pretty though... look at that depth!They picked out a good name for this one, because it's like staring into space and seeing pretty tiny stars everywhere.


And the formula? Well, they could have done better. I was surprised at how sheer this polish was, and I was worried when I painted on my first coat. It needed three coats to be opaque and I wasn't a big fan of the formula in combination with the wide brush Essence uses nowadays. Despite that, I love it very much and I am very glad to have it in my stash.

Thursday, April 25, 2013

Essence - Modern Romance

Hello there! So, my computer stopped working for a few days which completely threw me off my posting schedule for a short while. Sorry about that! Though, my new gametime for World of Warcraft is also partially to blame... um... oops. :)

Anyway, today I am showing you another Essence polish from their Colour & Go line!


Modern Romance is a really cutesy peachy nude colour. I'll say it right away - the pictures show the colour much brighter than it is. I couldn't get it right for some reason! It's a pretty soft colour that shows a subtle pink shimmer in the bottle. Unfortunately, this does not translate to the nail very much, which was slightly disappointing for me.


I'm also not happy with the formula. It was very hard to paint neat, thin layers with it and even after three coats I was still seeing bald spots on my nails. :( The colour is very nice, but bald spots bother me so much! I'm honestly quite disappointed by this polish, which is a shame because I do really like the colour.

I have said this before, but Essence's nail polishes are often a hit or a miss. While I love the brand, this one was a miss for me.

Saturday, April 13, 2013

Essence - Grey-t To Be Here

Hi guys!

Enjoying your weekend? I am! Today's post will be rather short but I am showing you an Essence polish from their Colour & Go line that I like very much.


Grey-t To Be Here is a light gray polish with a subtle but noticable pink shimmer in it. I am not one to wear gray polishes, but the shimmer in this is a really great touch, and makes this a really pretty polish. I'm very glad I bought this!

I'm not sure how well it works with my skintone, but I like how neutral it is.


The formula of this polish is fine. It covered in two coats and I did not have any issues with the application, so all in all I am quite happy with this polish and it's a perfect shade to wear for when I don't feel like doing anything flashy with my nails.

Monday, April 08, 2013

Evanora inspired nails

Have you seen Oz: The Great and Powerful yet? I haven't, but I definitely have to see it sometime. It looks really awesome. Since the movie came out I have seen some manicures inspired by Evanora's 'claw' nails in the movie. I really liked the look and so I decided to recreate them!


The result is a pretty edgy, but awesome manicure. When I was wearing this I kept looking at my nails, because it really felt like I had claws!

As you can see in the screenshot I linked earlier, Evanora doesn't seem to have a base colour on her nails and her nail line is visible. I didn't like that all too much which is why I used a nude base. I used two coats of Essence Cookies & Cream for this with a fast drying top coat. After that was dry, I taped off the sides of my nails to create the claw shape, and went over it with a coat of Essence Black Is Back, a simple black creme.


And, instead of two gold lines on each side of the claws, I decided to go with one gold line in the middle. I used gold striping tape that I got off eBay, but as you can see in the pictures it started curling up just minutes after I applied it, which was quite a shame. I do like the end result, though, and I love seeing all the different variations people are coming up with.

What do you think of this 'claw' look?

Thursday, April 04, 2013

Nail Polish Rings

Hello everyone! Today I have something different to show you. If you have been with me for a while you might remember the nail polish earrings I have posted about before. A while after I made that post, I decided to look into rings as well, and I have made quite a few. I took pictures of some of my favourites, which I will be showing in this post!

Also, would a how-to for nail polish jewlery be interesting? When I looked around for tutorials, I couldn't find many helpful ones, so if you're interested in seeing a tutorial by yours truly, let me know!

Anyway, let's start, shall we? Purple is my favourite colour for nail polish, so it's no surprise that my most favourite rings are all purple.


1. This picture does not do it justice, but this ring is SUPER sparkly in real life. I made this one with Claire's Purple Holographic Glitter that does not seem to have a name or number.

2. This ring is made with one of my favourite polishes in the world: Wet n' Wild Back Alley Deals. Guys, it's so pretty. I backed this one with black because the glitter didn't fully cover the back of the cabochon.

3. I don't remember what purple polish I used for this, but I do know I used the Spectraflair Topcoat by Piper Polish to give it a holographic shine. Again, the picture does not do it justice, but it looks amazing!

4. This one was an experiment that just happened to turn out awesome. I stamped NYC Platinum Card on the back of the Cabochon and then backed it up with Catrice Poison Me, Poison you. I love the result.

And now for some blues.


1. Oooh, sparkles! I used Claire's nameless blue glitter backed with black. I wear this one pretty often!

2. I'll be honest... I bought Essence Mr And Mrs Glitter just because I wanted to make a ring with it, since I don't like it on my nails very much. I'm glad I did, because this ring looks awesome. I backed it with black.

3. This ring didn't turn out the way I wanted it to, but I like it nonetheless. This is Essence Glorious Aquarius, backed with NYC East Village.

4. The crackle hype is long over and considered 'lame' by many people nowadays, but it honestly works great for jewelry! This is Barry M's black crackle backed with Essence Choose Me!. I love this combination.

And some other ones, these had to have their pictures taken at an angle to show off how pretty they are.


1. Another crackle! This is Barry M's black crackle again, this time backed with Catrice Genius In A Bottle. My sister thought of this combination of colours and we both have earrings like this. Reminds me of tigers!

2. This was another experiment that turned out nice. I used Catrice Hot Or Not? for the hot pink, Essence Stampy Polish for the white, and Essence Sweet As Candy for the background.

3. This was actually the first ring I have ever made, and I used Kleancolor Chunky Holo Purple backed with black. Very pretty!

4. And ofcourse, this is Essie Leading Lady. It looks amazing enough by itself, so that is the only polish I used for this ring. I probably wear this one most often out of all my rings. :)

I have more, ofcourse, but this post would be much too long if I wanted to show them all. I do hope you enjoyed seeing pictures of them! Nail polish jewelry is so much fun to make and I'll definitely be making more, so expect more posts about this sometime in the future.

Tuesday, April 02, 2013

Paint It Blue For Autism - Jelly Sandwich

As you may already know, April is Autism Awareness month and today is World Autism Awareness day. Many nail polish bloggers have decided to join forces and spread awareness by painting their nails blue for this day, others have decided to do a weekly blue manicure. I will be doing the latter.
I'm not usually very open about this, but the reason I decided to join this awesome initiative is because it's important to me personally. When I was very young, I was diagnosed with an autistic disorder. I wasn't an easy child and it has been a long and sometimes very difficult struggle to get where I am today, but I'm proud of myself for how far I've come, and for how much I am still improving day by day. I know what it's like to be misunderstood and mistreated and that's why this month is so important to those with autism.

So, to start it off, I have pulled out all the blue nail polishes I own (which is surprisingly not a lot!) and for the first day I decided to do a blue jelly sandwich. I'm not familiar with these, and this was only my second ever attempt.


I really wish the pictures did this manicure justice. In real life it looks a bit darker, and it has a lot of depth. The holographic square glitter looks amazing squished in between the layers of blue.

The blue polish I used to create this sandwich is a nameless and brandless blue I got together with my nameless green a while ago. I actually figured out the bottle shape is the same as Safari's bottles, but the caps are different and the only label it has on it says '145'. I bought this one because I'm looking for a TARDIS blue creme. When I tried it out for the first time I was disappointed because it's a very sheer jelly-like polish. Not exactly what I wanted, but great for this manicure.


First I painted two coats of the blue, because it's really sheer. It has a thin formula so I had to be very careful not to flood my cuticles. I let the two coats dry for a while and then I added glitter. I used Essence's glitter topper known as Julia as the glitter in the middle of the jelly sandwich and then painted another thin coat of my blue jelly on top of it. The result is pretty awesome, but it feels very thick on my nails, and it's drying very slowly, despite me waiting a long time for each coat to dry. I'm still happy with the result, though! :D


Saturday, March 30, 2013

Essence - Boho Chic

Say there's a nail polish you have been having doubts about, but you buy it anyway, and you end up loving it? Isn't that a great feeling? I love it when it happens to me, and I wish had happened with the polish I'm showing you today. :(


Boho Chic is a very interesting shade that attracted me because of the flakies in it. I've never seen a polish quite like it before, and on the swatched I'd seen it looked very pretty. But when I stood in the drug store with the bottle in my hand I had my doubts about it. This is not the type of colour I would usually wear, so I put it back in it's place. Several weeks later it was for sale with a big discount, so... why not?

It's a peachy orange colour, and a special nail polish because of the orange/golden shimmer and flakies in it. uit looks very interesting, and I love flakies, but I just didn't like the look of these. Plus, the orange tone is not  very flattering for my skin tone. Too bad!


As for application, there is nothing wrong with this polish. It applied nicely, so no comments there. I used two coats for the pictures, but it could have used another thin coat to get rid of VNL. Maybe I'll end up giving this polish away to someone who would appreciate it more, because I doubt I'll be wearing it again.

Wednesday, March 27, 2013

Nude + Pink taping

So it has been a while since I have done anything but a simple manicure with only one colour. However, I decided that I was in the mood to do some taping again, and I wanted to use one of my favourite new additions to my stash!


For this manicure I used Essence Cookies & Cream as a base colour. I used two coats on my index- and middle finger and my pinky, and three on my ring finger and thumb. This is a sandy nude colour with subtle shimmer in it. For some reason, nudes always look odd on my skin tone, but not this one! It's very pretty and I also like to wear it on my toenails because it gives a clean, neat look.


I added a quick drying top coat and after it had dried enough I used striping tape to tape off 4 lines on each finger. Then I painted over it with a coat of NYC Perpetual Peony, a simple pink creme, and quickly but carefully pulled off the tape. I smudged it in a few places... whoops! Nothing too bad, though. I think I'm getting better at it. :P


After that I added a silver rhinestone to my ring finger and thumb, just because I'm obsessed with my rhinestones. :) I really need to think of some new creative ways to use them! Anyway, then I topped it all off with another coat of fast drying topcoat and I was done. Even though it's a simple mani, I enjoy it a lot, and I think this colour combination works very well! I hope you like it too!

Wednesday, December 05, 2012

Reddit Challenge - Week 10: Winter

Winter has begun! As I am typing this blog post, it's snowing like crazy outside, so this week's theme in the Reddit 52 Week Challenge is very fitting: Winter.

Recently I've been seeing very pretty freehanded snowflake manicures on Reddit and other site, and I really loved them, so I wanted to do something similar. I am still awful at freehanding, however, so I used my stamping and dotting tools for my manicure.


Here is what I came up with. The blue base is Essence I Love Bad Boys, which has a subtle but very nice looking blue shimmer in it. I wanted to use a lighter base but I don't have that many blues yet, haha.

Then I stamped over it! I used one of the plates that I ordered from Born Pretty Store, and Essence Stampy Polish in white. I think I did a pretty good job at the stamping this time, even though it smudged here and there. With the same white polish I used my dotting tools to make snow flakes!


I felt like there was something missing, though. I wanted it to be more sparkly! So then I added some rhinestones, slapped a topcoat on it, and it was done. I think this manicure came out super cute, I hope you like it too! :D

Monday, December 03, 2012

Holo glitter gradient

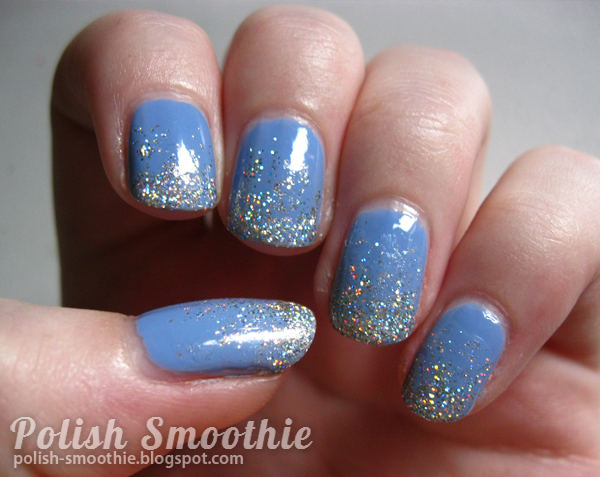
Hey everyone! Today I have a pretty simple manicure to show you. This is the first 'wintery' manicure I have done this year. At least, I thought it was wintery. :)


I love glitter gradients. They're really simple to make and they always look good. I've been in a glittery mood lately, so I think it's safe to expect more glitter this month, since I have a bunch that I don't use as often as I should!

For this manicure I used Essence Absolutely Blue, which is a soft light blue colour. I've often heard people say this is a perfect colour for summer, but I think blues are perfect for winter, which is why I chose this colour. Temperatures are starting to get cold and The Netherlands has had its first snow already, so it was fitting. The glitter is Essence Hello Holo.


I love Hello Holo, as you can see in the bottle in the pictures, it's super sparkly! I have worn this one so often, it's definitely my favourite glitter that I own. It goes with practically every colour, plus it's great for jewelry making as well, in my opinion.


I definitely was happy with this manicure! What do you think?

Tuesday, October 02, 2012

Reddit Challenge - Week 1: Taping

Hi guys! As some of you may know I am a frequent Redditor. :) Yesterday I found out that the laqueristas on there are hosting a 52 week challenge. That's right, fifty two weeks, each with a different theme. And it seems very doable, even for a nail art noob like myself, so I decided to have a shot at it. I will try my best to come up with a manicure for each week, so hopefully every week I will have a challenge post for you!

The theme for week 1 is taping, which just happens to be my favourite technique for nail art. I often use scotch tape to spice up some manicures, but this time I decided to try out my striping tape. So far I have only used my striping tape as accents on my nails, but this time I used them for masking.


And this is my manicure for the first week! I started out with Essie Turquoise And Caicos as my base coat. Once that was dry I applied a lot of small strips of striping tape on my nails. This was such a hassle to do and it took me quite a long time. Anyway, once I was done applying the tape I went over it with a coat of Essence You Belong To Me and then quickly removed the tape while the polish was still wet.

I personally like the outcome a lot, even if it's sloppy in some places. Overall though, I think I did a good job, especially for a first attempt at using my striping tape like this! I also love the colour combination.


Here's a picture of Turquoise And Caicos by itself. It's a very pretty creme and for me it was opaque in three thin coats. You could probably get away with two coats if you have shorter nails, though.

Monday, October 01, 2012

Essence - Gold Old Buffy

It's been a while since Essence released the Vampire's Love LE, a collection inspired by, well, vampires! It reminds me of Twilight, which I am totally not a fan of, but I did pick up two of the polishes from this collection. Today I'm showing you my favourite: Gold Old Buffy.


This polish is gorgeous. It's full of golden shimmer and irregular shaped golden flecks. The base looks black, but to me it seems more like a very dark brown or olive colour. I'm not sure, but either way, I love it! I'm a sucker for dark shimmery colours like this one and I'm very happy I added it to my collection.


The formula is great too. It's fully opaque in two coats and the application is very nice. No complaints there.

I felt a little silly after swatching this. I wore it shortly after I bought it, but for some reason it just didn't appeal to me as much then. Good thing I gave it a second chance because it's an awesome polish and I'll probably be wearing it more often this autumn and winter. 


Sadly, this polish isn't available anymore, and hasn't been for a long time. I recently heard that Essence will be releasing another collection like this soon, though, so I hope that one will also come to The Netherlands!

Sunday, September 16, 2012

Nail polish earrings

Hi guys! Today I want to show you some of the earrings I have been making recently. And yes - this is relevant to my blog because they were made with nail polish! I'm pretty sure that's not a new concept to most of you, but it's so much fun and there are so many endless combos you can make, I love it.


The first ones are made with one of my favourite polishes, Wet 'n Wild - Back Alley Deals. These earrings are super sparkly and pretty and I've worn them pretty often already. :)


Next up is a pair made with Essence - Blue Addicted. This polish is awesome and it's also amazing for earrings. The domed cabochons and the glitters give them a really cool looking depth!


These are fun too, and I made them with three different Golden Rose flakes. Unicorn Puke-esque, maybe? These are super sparkly as well.


I also decided to try stamping for the first time, and I ended up with these super cute zebra stripe earrings. I love love love these! I have a bunch more stamping plates on my way so once they get here I'm not only going to test them on my nails, but on my earrings as well. :D


Here is a pair that I made for a good friend of mine - who also follows this blog, hi Kyu! c: - I used the Spectraflair Topcoat for a gorgeous holographic effect over Stargazer 303. I will probably end up making a pair like this for myself at one point.

So what do you guys think, do you like my earrings? :D If you do, and you would like some for yourself, I am selling these! They cost between $8 and $12 and information about how to order them can be found on this page.

Monday, September 10, 2012

Coral and silver french tips

 Hey guys.  Today I have something pretty simple for you. I was feeling a bit uninspired so I wanted to give myself some simple french tips which for some reason just wasn't working out. That's why I came up with some differently coloured and diagonal tips!


This is how it turned out. The coral is Essence - Off To Miami! I originally bought this colour just so I had a coral and orangey colour in case Iever needed one but I ended up really liking it. I let it dry for an hour and then I added the silver tips which is NYC - Platinum Card. 


So yeah, pretty simple but I think it came out pretty nice! I really need to practice with tape some more to get sharper lines. Good thing I have a ton of ideas for tape manicures. :)