Thursday, August 30, 2012

Doctor Who nail art: Red Daleks

 Like it says on my Blogger profile, I'm a Doctor Who addicted girl. I'm a huge, huge fan of the show and I have watched all the episodes of the new series so far. I'm trying to watch the classics too, but they're pretty difficult to find on the internet. :( Nevertheless it's an awesome show. My family and some of my friends don't  understand my addiction at all and they think I'm completely mad when I try to tell them what Doctor Who is about. I don't blame them though, lol!

Anyway, to celebrate 'Asylum of the Daleks', the newest episode scheduled to air on september 1st, I decided to dedicate a nail art to the Dalek. Even though they do creep me out a little bit, they are my favourite villains in the show, plus my new rhinestones and striping tape were perfect to use for the idea I had.


There are a lot of varieties of Dalek but my personal favourite are the red ones. That is why I made a simplified Dalek on both of my ring finger nails, with their most widely recognised details.

For the base I used NYC I ♥ NY, my favourite red. For the eyepiece and the Daleks' hemispheres I used my rhinestones. The clear rhinestones work really great for the eyepieces, I think they look great! I had a bit of trouble with the black coloured ones, because not all of them were the exact same size and shape. There are supposed to be rows of 4, but obviously my nails are not long enough for that. It doesn't matter though, this still works! I then used two strips of silver striping tape to emulate the 'neck' area that seperates the head from the lower body.


Overall I think this turned out pretty awesome! It was very fun to do. I wanted to do all of my nails but I do plan on wearing this manicure until the new episode airs and I think so many rhinestones on every nail would drive me crazy. :) So for now I will have two mini Daleks to keep me company!


And, ofcourse... how could I resist?

What do you think, did I nail it? And are you as excited for the new episode as I am?

Also check out some other Doctor Who inspired nail art here! :D

Tuesday, August 28, 2012

Pink manicure with rhinestones

A few weeks ago I decided that I wanted to try out a manicure with rhinestones, so I snooped around on eBay and purchased 3000 small nail art rhinestones in 12 different colours. They arrived yesterday and I went to make a manicure with them right away! As this was my first time ever using rhinestones, I went with something simple.


This is what I came up with, and I'm very happy with how it looks! I have to apologize for my dry skin. Every few weeks I do volunteering work at a local boarding kennel, and we have a new cleaning method... one that apparently is not nice at all for my nails and skin!

For the base I used Essence - Roy's Red from the Whoom! Boom! collection, and on top of that I placed one clear rhinestone on each nail using a toothpick and clear polish. I was surprised with how easy this was, because I have extremely shaky hands. It was very fun to do, so I'm already planning on some other manicures I can creature using my brand new rhinestones.


After putting the rhinestones on my nails I sealed them in with a layer of topcoat which for some reason made them a little 'matte', though not completely, as they are still shiny. I actually really like the look of it, so I don't mind. I'm curious to see how it will look with the other colours, though. :)


This is my little case of 12 different coloured types of rhinestones. They're all round and very tiny. I think it would be fun to get some differently shaped ones sometime. In case you're wondering, I purchased this case from the seller directsz on eBay for $2,06 which is dirt cheap! You'll have to be patient though, for me it took 20 days for them to get here.

NYC - Rock Muse

On friday I finally had a chance to go to town and get some things I needed. And while I was there, I decided to pick up some new polishes as well, because every brand seemed to have some new ones in their collection. I picked up 7 of them and today I am going to show you one.

This is NYC - Rock Muse. It's limited edition, and I think it's pretty similar OPI - Metallic 4 Life so I'm glad I managed to get this one!


This polish has silver hex glitter and micro glitter in a sheer dark grey base. It's actually a topcoat, meant for layering over other polishes. In these pictures I have layered one coat over black. Application wasn't that great. The formula seemed a little thick, and I had difficulty spreading the glitter on my nails evenly, which you can see by comparing the glitter on my pointer finger to that on my ring finger. That was a shame.

Even with a top coat it looked a bit bumpy and odd, but it did feel smooth on my nails. I do love the silver glitter on black, it really gives me a punk rocky feeling, which I always like!


Overall not a bad nail polish, and if you like OPI - Metallic 4 Life and want to own something similar, I'd definitely get this one. Considering how cheap it is, it's worth it.

Friday, August 24, 2012

Catrice - Steel My Soul

A few days ago I was in town for a short while and I was able to pick up some of the new Essence and Catrice polishes. Today I'm going to show you Steel My Soul from Catrice, one of the two new brushed metal effect polishes!

I'll admit I was a bit hesitant to get these because matte polishes are usually not my thing. However, after seeing some swatches with topcoats, I decided I needed them.


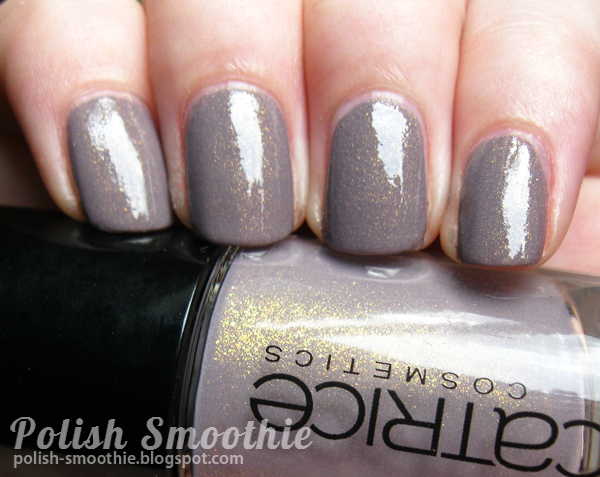
Steel My Soul is a light taupe colour with a bit of a lilac tone to it, and a very pretty yellowish golden shimmer. The above picture is what it looks like when dried, kind of a suéde, textured finish. It looks pretty nice, and I did like it more than the average matte but it's still not my cup of tea.


...much better! It's super pretty with a top coat. The sparkles are very noticable and really pop. 


A closeup to show the shimmer. It looks like tiny glass flecks. Very nice.

Thursday, August 23, 2012

Essence Gel-Look Topcoat - Bubble horrors!

I just want to express my disappointment here. For a while I have been trying out the Essence Gel-Look Topcoat because it was promised to be fast drying and leave a gel-like look on the nails.

 At first I was pretty happy with this topcoat. It does leave a glossy shine on your nails. But it has to be the slowest drying topcoat I have ever tried. I had to be very careful even hours after doing my nails, and still I'd end up with dents and scratches all over my manicure. Okay fine, I thought. I can work around that by doing my nails during a TV show or a movie so I can sit and do absolutely nothing. That worked fine enough for a while, because I ran out of my other topcoat and since there aren't many stores near me I didn't have a chance to pick up a new one.

After a week or so the topcoat started becoming really gloopy and thick. It was very hard to control and I'd end up with a thick layer of topcoat which took even longer to dry than it did before. I don't have any type of thinner though, so this was quite a disappointment. At least it still applied smoothly, or so I thought.

But now, with my past few manicures, it has gotten even worse. Apart from being gloopy and thick, it didn't even apply smooth anymore. Also, I now get bubbles. A lot of them. All over my nails, over every manicure, no matter what I do. I'm not always the brightest person, so when I did my first successful attempt at gradient and saran wrap nails I put this topcoat over it to smoothen things out. After a few minutes I wanted to kick myself in the head for making that horrible, horrible decision.

Bubbles. Sad bubbles.

This picture is cringe worthy, I'm not sure why I even watermarked it, because no one in the world would want to steal this picture, lol! Just ook at all those bubbles and how bumpy it is. It even made my gradient look a lot worse. Topcoat... Y U DO THIS? :(

Honestly I'm not sure if every bottle is like this or if I happened to get a bad one, but I do know that this one is going in the trash and I'm picking up at least one new top coat tomorrow! Have you tried this topcoat? Did you like it or was your experience with it as horrendous as mine? Do you have any topcoats to suggest to me? I'd love to hear them.

Wednesday, August 22, 2012

Essence - It's Purplicious Comparison

As some of you may know, Essence has a series of special effect toppers, including glitter top coats. These glitter toppers are some of my favourites because they are very pretty and very cheap.

While I was going through my stash I noticed I have two polishes named 'It's Purplicious'. They're both purple glitter top coats. I'm not sure why Essence gave them the same names, because they're completely different! Today I'm going to show you both of them.


Here they are next to each other, 'Version 1' (left) and 'Version 2' without any base colour underneath. 

In sunlight

Version 1 has pretty small and round purple and silver glitter, with some bigger holographic glitters scattered around. The holographic glitters really add to this top coat, I love it! It's very easy to apply evenly and even without a top coat it's not very bumpy. This one is my favourite.

Version 2, which is apparently harder to find, also has small purple and silver glitter, with big chunky square glitters that are super shiny. It's fairly easy to apply but I did need to dab on the bigger glitters to ensure they were spread out evenly. It's also a bit bumpy, but nothing that top coat can't fix.

I have also layered them over black to see what it would look like!


Ahh, so pretty, aren't they? I love purple, it's my favourite colour for any polish, be it glitter or creme.

In sunlight

So overall these glitters are very pretty and a great addition to my stash! I'm wearing version 1 on my toenails right now and it's super sparkly and gorgeous. If you like these, you should definitely keep an eye out for any of the other glitter top coats by Essence.

Monday, August 20, 2012

Pastel and Silver Dotticure

Polka dots are awesome. I'm sure a lot will agree with me. It's also one of my favourite simple nail art methods, because it's extremely easy to do, and it always comes out so cute!

I especially love them combined with pastel colours and that's exactly why I did this dotticure.

Even my camera bag has polka dots!

The pink is Catrice - Sweets For My Sweets, two coats. A very cute pink with a subtle shimmer, it looks brighter in the pictures than it is in real life. The green is Catrice - Sold Out Forever, two coats. It's the original colour that was discontinued earlier this year, and it also has a subtle shimmer. For the dots I used Essence Rock N Roll which is a simple glittery silver.


I really liked the outcome of this manicure, and the idea of the silver dots. It really adds something and makes the overall manicure just a tad more interesting.

Saturday, August 18, 2012

Piper Polish - Spectraflair Topcoat

Hello! Today I have for you an absolute must-have if you're into holographic nail polishes. The Spectraflair topcoat by Piper Polish is made with a highly sought after holographic pigment that can change any colour into a gorgeous holo. This is perfect for people like me who simply can't afford to buy a lot of different holographic polishes.


For this post I have layered it over Essence - Break Through, a perfect purple creme. This is two layers of Break Through and one layer of Spectraflair. No topcoat. Look at that holographic effect! It's subtle but gorgeous. You can make the effect stronger by adding more layers to it.

The topcoat applies like a charm and you only need a little to create the effect. Even a mini bottle will last you a while.


Even when the holo effect isn't noticable you can still see a very pretty shimmer over your polish!


Close up. The topcoat has tiny particles and even without topcoat it's super smooth and shiny.

Needless to say, I'm a fan. A huge fan. This topcoat is gorgeous and it's great for any colour you can possibly think of. I personally have been layering it over bright cremes but it also looks amazing on darker colours and shimmers. The possibilities are endless.

If you're interested in the Spectraflair topcoat then I recommend you check out the Piper Polish Etsy shop, where you can purchase both the mini (5 ml) and the full size (15 ml) version of it!

Thursday, August 16, 2012

Lavender French Tips

Today I was feeling inspired. I saw a lot of pretty french manicures on several websites, and I decided to try my own. I have these french tip nail guide stickers, but they were absolutely terrible, and I am horrible at freehanding anything except for dots. As a result, my first ever attempt at taping was born!


It's definitely not perfect, but also not bad for a first try. It was surprisingly easy, and I'm very happy with how it turned out! I'm probably going to try out different colour combinations.


As for the colours, I used Essence Pink Diamond for the stripes and NYC Lavender Cupcake for the tips. Topped it off with the Essence Gel-Look Topcoat. I think I would have liked silver stripes better, but I like this combination as well!

Wednesday, August 15, 2012

Essence - Did Someone Say Nude?

Essence is probably my second favourite brand. It's very affordable and they have a wide range of polishes, although they are really a case of hit or miss.

The polish I'm wearing today is Essence - Did Someone Say Nude? from the Season of Extremes limited edition collection. It's a very cute pastel mint creme... not a nude at all! What's the name all about? Despite that, I like the colour a lot.


I'm personally a big fan of cute pastel colours like these. However, I wasn't very happy with the application of this one. The first coat was extremely streaky and looked terrible, so I was pretty worried about what the outcome was going to look like.


Fortunately it wasn't too bad! The polish evened out fairly well at the second coat, and that is all I needed for my short little nubs. I'm sure you will need three coats to get a nice opaque result on longer nails.

Overall a decent polish with a lovely colour. While the application isn't what I'd like it to be, for such a cheap price, I'm willing to look past that.

Tuesday, August 14, 2012

Kleancolor Chunky Holo Purple


Today I want to show you one of my favourite nail polishes: Kleancolor Chunky Holo Purple.

Anyone who knows me, knows I have a weakness for glitters and shifting colours. That is why I just had to have this polish. I lusted over it for about a year before I finally saw a cheap bottle on eBay and bought it, and I'm so glad I did! I'm also definitely planning on getting more of the set, Chunky Holo Black in particular. :)


This is Chunky Holo Purple layered over Essence Purple Cherry, a dark purple. As you can see the polish is definitely not holographic, but look at that gorgeous glitter! It's a multichrome glitter in a very sheer purple base. The glitters mostly seem orange and green to me, but shift to blue and yellow depending on the way you look at it. Absolutely amazing.


Look at that colour shift! Isn't it pretty? :D

Colours like these are also perfect for earrings, so I immediately made a pair.


I love how different it looks this way.

So, if you like mulitchrome and glitter, this one is definitely for you. And be sure to check out the others of the Chunky Holo set as well!

Sunday, August 12, 2012

My first post.

Follow my blog with Bloglovin!

Hello!

My name is Tess and I'm a 20 year old girl from The Netherlands. My biggest hobby and obsession is nail polish and anything that has to do with it. This hobby started two years ago, and I have mostly done simple manicures. However, I'd love to start trying out new things.

I like sharing pictures of my manicures on Twitter and Instagram but I have decided to start a blog. I don't expect to get many followers at all, but it's something I enjoy that keeps me busy. So, if you do decide to follow me, I hope you will enjoy my posts!

To start off my blog, I want to share some of the nail polish earrings that I've made. :)

This is probably the favourite pair I have done. I used Golden Rose Scale Effect 11 on top of NYC City Blackout. They look like little gems!

More after the break!