Showing posts with label nail art. Show all posts

Thursday, October 03, 2013

Leopard mani with Bluesea bow review

Hi guys! Today I have another review for you. I already showed you the studs from KKCenterHk, but they also sent me some adorable 3D bow decorations by Bluesea.


These bows come in a ton of different colours and patterns but I personally decided to go with these with a white background and a pink and black leopard print because I'm a big sucker for leopard prints... I'm pretty sure I've said that before, though.

I made a matching nail art with them, using Essie Mod Squad as my base and NYC City Blackout with white acrylic paint for the leopard print. 


The bows are fairly small and should apply to every nail with ease. The site recommends you to apply them with nail glue. DO NOT apply them with topcoat if you intend to reuse them! I personally used topcoat, having no nail glue, and with removal of the bow I had to be very careful not to ruin it. Keep this in mind if you plan to order them. However, even with just the topcoat it stayed on an entire day before I removed it before going to bed. That's pretty great, in my opinion.


These bows retail for $4.00, which is a very fair price considering that these are intended to be reusable. They come in packages of two, which means you can use them for a cute accent nail on both of your hands. Yay!


Also, don't forget about my coupon code!
When ordering at KKCenterHk you can use the code POLISH-SMOOTHIE at checkout
to receive a 10% discount on your order.


Saturday, September 14, 2013

Saran wrap and KKCenterHk studs review

Hello everyone! I am finally back. It took some time but, lots of rest and cuticle cream later, my nails seem to be back in shape. I'm not really sure what happened to them but for a while they were VERY brittle, kept breaking and overall looked too terrible for swatches or nail art. It sucked!

To start it off, today I have a simple nail art and a review. KKCenterHk was nice enough to send me two products for review and today I will be showing you the first one: some very cute studs!


I didn't want to use these studs for a plain manicure. Instead I chose to do a subtle one with pastels. I used Essie Lilacism as my base and a layer of Essie Bikini So Teeny to create the pattern with saran wrap. I thought it looked very cute. If you want to know how to do this, just do a quick Google search. It's a very simple technique and there are lots of tutorials to be found.


So, how about the studs? They are pretty tiny, dark coloured studs that I found were very easy in use. I had no problem whatsoever picking them up and placing them on my nails. They are rounded on top but their backs are flat and stay on the nail quite nicely. After applying them to the nail, use a coat of topcoat on top of them and they stay on like cement. They would be perfect for a dark, edgy nail art or manicure!


The studs measure 2mm in diameter and come in packs of 50, and the best thing is that these are reusable. Just take them off, clean them with nail polish remover and use them whenever you like. You can find them here, but I'd suggest also looking at their other studs because they have them in all shapes, colours and sizes! These retail for $4.23 and KKCenterHk offers free worldwide shipping.


And just for my readers, I have a special coupon code.
When ordering at KKCenterHk, use the code POLISH-SMOOTHIE at checkout to receive a 10% discount on your order!

Monday, July 08, 2013

It's my birthday!

Hi everyone! As you can read in the title, today is my birthday. I turned 21 years old, so I am really officially an 'adult' now. :P Which is why today I'll be showing you what I'm wearing on my nails for my birthday mani!


I think I am starting to get the hang of my new camera!

Here's what I did - a simple manicure with a half moon accent. It seems I always grab this particular polish when I want something pink. It's just a lovely shade with an awesome formula. This colour is NYC Perpetual Peony, ofcourse!

To make it even cuter I added some rhinestones I found while shopping a few days ago. Apparently these are meant for application on clothing and other things but they are fine for on nails as well! For the Dutchies that read my blog, these can be found for €1.99 at the Action in a wheel with a bunch of different colours. I also got some studs at the same place, that I will hopefully try out soon.


I love half moons because they look so classy! I'd love to do a similar manicure sometime, but with a lighter, soft pink colour. That's originally what I wanted, but I didn't have the right polish for it.

Anyway, that's it for today. I'll be spending my evening with my family... and cake! Yay, cake. Have a lovely day! :)

Thursday, June 20, 2013

Nubs with polka dots

Hello, readers! Things have been a bit quiet from my side because I haven't really felt like posting. This is why:


Yep. As you can see, my nails are short little nubs now. :/ I had a really dumb accident in the kitchen last week and the tip of the nail on my middle finger popped off completely. I had to file them all down. They are a bit longer now, but it sucks!

I thought I would make them look cute to distract myself from how short they are. Polka dots are always cute, right?


For the base colour I used H&M City. This polish actually belongs in a duo but it's a very nice pink crelly so I like to wear it on its own, too. For the dots, I used acrylic paint. I have been trying to use my acrylic paints for nail art, and so far I really like it. I only have a limited selection of colours, but I am thinking of getting more. :D

Tuesday, May 28, 2013

Blue fan brush mani

Hey guys!

So, I have had a set of nail art brushes for a while now and I realized I had never actually used the fan brush that was in it. I was unsure what to do with it until I saw some tutorials popping up. Turns out that you are able to create very cool looking manicures that are simple to do. Perfect for me!


After some fiddling around with colours this is what I came up with. Pretty cool, huh? Personally, I'm very fond of the effects that the fan brush gives. And like I said, it's extremely simple.

What I did was start out with two coats of a simple black creme, in this case Essence Black is Back. I left it alone until it was completely dry which is when I grabbed my fan brush. I made the hairs of the brush slightly wet and seperated them a bit. Then I dipped the tips in Catrice Blue's Brother. And swiped the brush across my nail.


You can kinda experiment with the brush. You can swipe over your nails just once, for example. But for most of my nails I did two strokes: one starting from the left side, to the middle of my nail, and the other from the right. It created this nice effect that looks different on each nail.

I only used one colour this time, but I can see this being very interesting with two colours! What do you think?

Sunday, May 19, 2013

Lavender Stamping and a new layout!

Hey guys! I am back from my little break. I caught a nasty cold so it took a bit longer than I wanted to. I'm still not completely better but I did feel like fiddling around with nail art stuff, AND my blog layout. What do you think? I mainly wanted to change it so I could actually respond to the comments I get. I was starting to feel bad for not being able to interact with you guys properly. I hope you like the new layout. :)

So, I decided to try my hand  at stamping once again, since it had been a while. :D


Okay, my colour and plate choice was a bit random this time, haha. And as you can see, my stamping skills could really use some improvement. But keep in mind this is only about my fifth time doing a full manicure with stamping and that I have a lot to learn!

The base colour is NYC Lavender Cupcake, one of my favourite cremes. Since I don't have any Konad polishes (they have been on my wish list for a while now...) I rummaged through my stash trying to find a decent polish to stamp with. I ended up with Essence Unexpected Galaxy which is actually one of their colour changing nail polishes. I knew it was an opaque polish, though I wasn't sure what it was going to look like after I applied my top coat, haha Fortunately, it wasn't too bad!


I ended up stamping an image from one of my Born Pretty Store plates. This one is from stamping plate m65 and I thought it looked pretty groovy.

So what do you think? How bad of an attempt is this? Also, feel free to share any tips and tricks you might have for me!

Monday, April 08, 2013

Evanora inspired nails

Have you seen Oz: The Great and Powerful yet? I haven't, but I definitely have to see it sometime. It looks really awesome. Since the movie came out I have seen some manicures inspired by Evanora's 'claw' nails in the movie. I really liked the look and so I decided to recreate them!


The result is a pretty edgy, but awesome manicure. When I was wearing this I kept looking at my nails, because it really felt like I had claws!

As you can see in the screenshot I linked earlier, Evanora doesn't seem to have a base colour on her nails and her nail line is visible. I didn't like that all too much which is why I used a nude base. I used two coats of Essence Cookies & Cream for this with a fast drying top coat. After that was dry, I taped off the sides of my nails to create the claw shape, and went over it with a coat of Essence Black Is Back, a simple black creme.


And, instead of two gold lines on each side of the claws, I decided to go with one gold line in the middle. I used gold striping tape that I got off eBay, but as you can see in the pictures it started curling up just minutes after I applied it, which was quite a shame. I do like the end result, though, and I love seeing all the different variations people are coming up with.

What do you think of this 'claw' look?

Tuesday, April 02, 2013

Paint It Blue For Autism - Jelly Sandwich

As you may already know, April is Autism Awareness month and today is World Autism Awareness day. Many nail polish bloggers have decided to join forces and spread awareness by painting their nails blue for this day, others have decided to do a weekly blue manicure. I will be doing the latter.

I'm not usually very open about this, but the reason I decided to join this awesome initiative is because it's important to me personally. When I was very young, I was diagnosed with an autistic disorder. I wasn't an easy child and it has been a long and sometimes very difficult struggle to get where I am today, but I'm proud of myself for how far I've come, and for how much I am still improving day by day. I know what it's like to be misunderstood and mistreated and that's why this month is so important to those with autism.

So, to start it off, I have pulled out all the blue nail polishes I own (which is surprisingly not a lot!) and for the first day I decided to do a blue jelly sandwich. I'm not familiar with these, and this was only my second ever attempt.


I really wish the pictures did this manicure justice. In real life it looks a bit darker, and it has a lot of depth. The holographic square glitter looks amazing squished in between the layers of blue.

The blue polish I used to create this sandwich is a nameless and brandless blue I got together with my nameless green a while ago. I actually figured out the bottle shape is the same as Safari's bottles, but the caps are different and the only label it has on it says '145'. I bought this one because I'm looking for a TARDIS blue creme. When I tried it out for the first time I was disappointed because it's a very sheer jelly-like polish. Not exactly what I wanted, but great for this manicure.


First I painted two coats of the blue, because it's really sheer. It has a thin formula so I had to be very careful not to flood my cuticles. I let the two coats dry for a while and then I added glitter. I used Essence's glitter topper known as Julia as the glitter in the middle of the jelly sandwich and then painted another thin coat of my blue jelly on top of it. The result is pretty awesome, but it feels very thick on my nails, and it's drying very slowly, despite me waiting a long time for each coat to dry. I'm still happy with the result, though! :D


Saturday, January 05, 2013

Seven Nation Army

Hey everyone! ... it's been a few weeks, I know. I haven't forgotten about you guys or my blog, but I guess you could say I was taking a little break. I promise I will try to make my posts more consistent, haha. :P

So today I want to show you a manicure I did a while back. It was done for the Reddit nail challenge, which I decided I won't be taking part in every week anymore. I just have not been doing my nails as often, and when I do, I want to do my own thing, and not be limited to that week's theme, or by my horrible art skills. So I'll do a manicure for the themes whenever I feel like it and have an idea I can use.


This week the theme was a manicure inspired by a song. And for me, it wasn't very hard to pick a song to use as my inspiration. I went for 'Seven Nation Army' by The White Stripes. It's an awesome song, that I have liked since I was a lot younger, and it has one of my most favourite music videos ever, which was the main thing that inspired me. I tried to translate the red/white/black shapes to my nails.

Also, I am sorry for the shape my cuticles are in. I ran out of Lemony Flutter and can't afford a new pot yet, and nothing else works well enough for weather like this. 


All the polishes I used for this are by NYC, and I did the manicure as follows:

First, I painted my nails with two coats of I <3 NY, a red creme that I seem to use pretty often for nail art. After this was completely dry I taped off a chevron shape and painted one coat of Platinum Card. I chose silver instead of white because I felt it fit the manicure better. Then, when that was dry as well, I taped off a smaller chevron and used City Blackout for the tips.


I enjoyed making this manicure and I thought it looked really nice on my nails, so I must say this is probably one of my favourites that I have done so far. I hope you like it as well, let me know what you think! 

Wednesday, December 05, 2012

Reddit Challenge - Week 10: Winter

Winter has begun! As I am typing this blog post, it's snowing like crazy outside, so this week's theme in the Reddit 52 Week Challenge is very fitting: Winter.

Recently I've been seeing very pretty freehanded snowflake manicures on Reddit and other site, and I really loved them, so I wanted to do something similar. I am still awful at freehanding, however, so I used my stamping and dotting tools for my manicure.


Here is what I came up with. The blue base is Essence I Love Bad Boys, which has a subtle but very nice looking blue shimmer in it. I wanted to use a lighter base but I don't have that many blues yet, haha.

Then I stamped over it! I used one of the plates that I ordered from Born Pretty Store, and Essence Stampy Polish in white. I think I did a pretty good job at the stamping this time, even though it smudged here and there. With the same white polish I used my dotting tools to make snow flakes!


I felt like there was something missing, though. I wanted it to be more sparkly! So then I added some rhinestones, slapped a topcoat on it, and it was done. I think this manicure came out super cute, I hope you like it too! :D

Tuesday, November 06, 2012

Reddit Challenge - Week 6: Games

Hey guys! No, I didn't actually miss a challenge. I did do week 5, but I wasn't happy with the manicure at all. I did post it on Reddit however, so if you can find me there, you can have a looksie at what I did last week.

So I was pretty excited about this week's theme, which is 'Inspired by a game'. I'm not a hardcore gamer but gaming is one of my hobbies and you can often find me playing World of Warcraft, Minecraft, Pokémon games, or random games on my iPhone. I wanted to dedicate a nail art to one of these games, but I went for the most obvious choice for me: Pokémon.

Pokémon has always been one of my favourite things. I got Pokémon Yellow over 10 years ago and never really stopped loving it! I've finished most of the handheld games save for some of the newer ones. I admit, I have been a bit out of the loop, but that doesn't mean I don't like it anymore.

To portray this theme I decided to paint little Pokéballs on my nails. This isn't the most original nail art, but hey, it works. The original plan was to do a different Pokéball on each nail but I don't have the right colours for it. It's something I will definitely do in the future, though.


So here's how I did this: I started out by painting all my nails with two coats of Essie Blanc, a simple white creme. I applied a quick drying topcoat and let it dry for a while before taping half of my nail and adding a coat of NYC I <3 NY, for the upper red half of the Pokéballs. I taped it because I am really, really horrible at freehanding with regular polish brushes, haha. Then I added black lines with my black striper, and after that I used my dotting tools to add the black and white buttons in the middle.


One of my Poochyena figurines wanted to make a little guest appearance. :) I don't usually use props for pictures but I figured it would be cute for this one. Poochyena is one of my favourite Pokémon, by the way.

These nails were pretty simple to do but I think they turned out really cute. I love having little Pokéballs on my nails. I hope you like them too!

Tuesday, October 02, 2012

Reddit Challenge - Week 1: Taping

Hi guys! As some of you may know I am a frequent Redditor. :) Yesterday I found out that the laqueristas on there are hosting a 52 week challenge. That's right, fifty two weeks, each with a different theme. And it seems very doable, even for a nail art noob like myself, so I decided to have a shot at it. I will try my best to come up with a manicure for each week, so hopefully every week I will have a challenge post for you!

The theme for week 1 is taping, which just happens to be my favourite technique for nail art. I often use scotch tape to spice up some manicures, but this time I decided to try out my striping tape. So far I have only used my striping tape as accents on my nails, but this time I used them for masking.


And this is my manicure for the first week! I started out with Essie Turquoise And Caicos as my base coat. Once that was dry I applied a lot of small strips of striping tape on my nails. This was such a hassle to do and it took me quite a long time. Anyway, once I was done applying the tape I went over it with a coat of Essence You Belong To Me and then quickly removed the tape while the polish was still wet.

I personally like the outcome a lot, even if it's sloppy in some places. Overall though, I think I did a good job, especially for a first attempt at using my striping tape like this! I also love the colour combination.


Here's a picture of Turquoise And Caicos by itself. It's a very pretty creme and for me it was opaque in three thin coats. You could probably get away with two coats if you have shorter nails, though.

Friday, September 28, 2012

Vampy Chevron Nails

Today I'm showing you another tape manicure. I really love to do these just because it's so fun and simple and it's easy to come up with awesome looking results.

So today I decided to do chevrons. I have done these as accent nails here and there but today I wanted to try my hands at a full chevron manicure. And I wanted it to be vampy, so I chose black and red as my colours.


I started by painting the red on my fingers, which is NYC I ♥ NY. Which is a gorgeous red, by the way! I've worn this one pretty often, and so far it's my favourite red I have owned. I also used only one coat for this picture, which is pretty awesome.


After that tried I went ahead and applied the tape to all of my fingers and then add the black. I personally prefer to do it in this order, but you can also start with the black and then add the red later. The black is also by NYC, it's called City Blackout. Again, lovely polish. My favourite black so far.


I really, really like the outcome of these nails! But, sadly, they got ruined about 5 minutes after I was done... I spilled nail polish in my carpet. D'oh! I was so glad I managed to shoot a few pictures before that happened. I'm definitely going to be remaking this manicure, though!

Sunday, September 23, 2012

HerĂ´me Take Away 'Chique Red'

Autumn has arrived! I like autum and winter, because it means I get to wear darker, vampy shades. Wearing those in the summer feels a bit odd to me! Today I am showing you a polish I recently bought that I think is going to be one of my autumn favourites.

When I was at my boyfriend's house, we went shopping in a mall and in one of the drug stores I found a box with HerĂ´me's adorably tiny Take Away nail polishes. I took two with me, a beige holo and this pretty red.


It's a brownish shimmery red that flashes to an interesting greenish shade in the bottle, but it's not noticable on the nails. I love the colour so much! It's perfect for this time of the year, so I'll probably be wearing it more.

The polish does not seem to have a name anywhere on the bottle, but after a bit of research I found out HerĂ´me is selling these minis on their website, and this one might simply be named 'Chique Red'. Don't take my word for it, though.


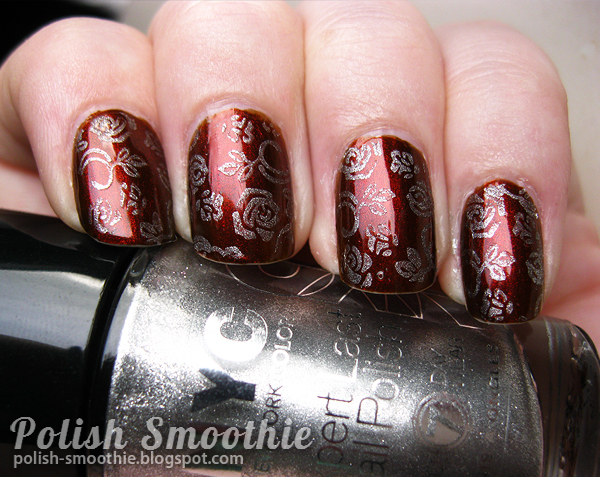
...and then after a day I felt like doing some more stamping. And I think I did a better job this time! I picked out a rose design and stamped it on using NYC Platinum Card (I really love this silver). I really like how it came out.

Friday, September 14, 2012

Stargazer 138... plus taping!

Hi guys! I'm at my  boyfriend's house right now, and I will be staying here for a few days. I have some posts planned ahead but I probably won't be able to comment anywhere. Just a heads up. :)

Stargazer is a very cool brand. So far I own three polishes by them and all of them are gorgeous and awesome additions to my collection. Today I'm going to show you one of these pretties plus some taping I added to it!


The nail polishes don't have names but this is 138, a very pretty green. I only picked up this polish because it was on sale for super cheap. I figured 'Why not?' and got it because I didn't have a colour like it yet. When I put it on my nails for the first time I loved it!

It is slightly duochrome, flashing to a greenish blue on certain lights, as you can clearly see in the bottle in the picture above. It's also crazy shiny and has a gorgeous depth to it. I keep looking at my nails!


Now the formula of this one isn't that great because it is a bit thick and gloopy, which made application a bit tricky. But for the price I got this for, I can definitely live with that.

After a few hours of wearing it, though, I got bored and tried out some more taping.


So I added black tips and a chevron tip as an accent nail! I really like how this looks, the black tips make it look very classy. :)

Do you own any Stargazer polishes? Which is your favourite?

Monday, September 10, 2012

Coral and silver french tips

 Hey guys.  Today I have something pretty simple for you. I was feeling a bit uninspired so I wanted to give myself some simple french tips which for some reason just wasn't working out. That's why I came up with some differently coloured and diagonal tips!


This is how it turned out. The coral is Essence - Off To Miami! I originally bought this colour just so I had a coral and orangey colour in case Iever needed one but I ended up really liking it. I let it dry for an hour and then I added the silver tips which is NYC - Platinum Card. 


So yeah, pretty simple but I think it came out pretty nice! I really need to practice with tape some more to get sharper lines. Good thing I have a ton of ideas for tape manicures. :)

Tuesday, September 04, 2012

Catrice - Poison Me, Poison You + Stamping

Something really stupid happened two days ago.

I was craving chocolate milk so I opened up the fridge and grabbed the carton from the door. Then, I dropped it. And in an attempt to save the carton from falling on the floor I broke my middelfinger nail. Oops.

The difference in length looked too silly to me so I shortened all my nails to sad little nubs and gave myself a simple manicure, since it also ruined my previous one.


This is Catrice - Poison Me, Poison You, a gorgeous shimmery dark purple with warm undertones. Purple is pretty much my favourite colour for nail polish and this one is one of my favourites.

It's opaque in two coats and it dries pretty fast. I had no trouble applying it, the formula is great and ofcourse Catrice has a wonderful brush which made it very easy to apply.

I wore it by itself for one day but today I felt like it needed something extra. I did my first real attempt at stamping. Sure, I have used my stamp for creating my earrings, but I never had a succesful attempt on my nails yet. I recently bought a new silver, NYC Platinum Card and it was surprisingly good to stamp with!


I used one of the Essence stamping plates that I own and I think it turned out pretty cute. As you can see, the stamp didn't transfer that great everywhere, but I think that mostly is to blame on the plate itself.

However, I recently ordered a set of stamping plates from Born Pretty Store so hopefully those are of a better quality and you'll see more manicures with stamping soon! It's such a simple way to spice up a manicure and make it look awesome, so I'm looking forward to fiddling around with my new plates. :)

To end this post, have a gerbil.


Little Ben here tried to eat my camera!

Sunday, September 02, 2012

Pink French Tape Manicure

 A few days ago the rolls of striping tape I ordered finally got here! I already tried it out for my Dalek nail art but since I watched the season premiere yesterday I decided to do a full manicure with my striping tape.

... speaking of Doctor Who, if you have seen it, wasn't it amazing? I'm not going to spoil anything for those who still need to see it, but I loved it! :D

Anyway, the manicure I did was not an original idea of mine. I pretty much copied a manicure I found on Google, and I wanted to give proper credit to the person who did it but I forgot to save the link to their blog and I can't find it on Google anymore. So if the idea seems familiar, that's why.


This is my result. While striping tape is very helpful for making shapes and sharp lines I really love to add them to the nail as an accent. So for this manicure, I first used some regular scotch tape to create the diagonal french tips. After that had completely dried, I carefully added the silver striping tape. I really need to practice with putting the tape on properly because some bits of tape at the edges are letting loose as I'm typing this. Oops.


After I had added the tape I added some glitter to my tips. I'm still not sure if I like the glitter or not, though.

The polishes I used were Catrice - Hot Or Not? for the pink tips and Essence - Party Princess for the glitter. The striping tape I purchased from eBay. I have 10 different colours that I got for about 4 dollar from this seller. I'm pretty happy with it and ofcourse I'm already thinking of other manis to create with it. :)

Thursday, August 30, 2012

Doctor Who nail art: Red Daleks

 Like it says on my Blogger profile, I'm a Doctor Who addicted girl. I'm a huge, huge fan of the show and I have watched all the episodes of the new series so far. I'm trying to watch the classics too, but they're pretty difficult to find on the internet. :( Nevertheless it's an awesome show. My family and some of my friends don't  understand my addiction at all and they think I'm completely mad when I try to tell them what Doctor Who is about. I don't blame them though, lol!

Anyway, to celebrate 'Asylum of the Daleks', the newest episode scheduled to air on september 1st, I decided to dedicate a nail art to the Dalek. Even though they do creep me out a little bit, they are my favourite villains in the show, plus my new rhinestones and striping tape were perfect to use for the idea I had.


There are a lot of varieties of Dalek but my personal favourite are the red ones. That is why I made a simplified Dalek on both of my ring finger nails, with their most widely recognised details.

For the base I used NYC I ♥ NY, my favourite red. For the eyepiece and the Daleks' hemispheres I used my rhinestones. The clear rhinestones work really great for the eyepieces, I think they look great! I had a bit of trouble with the black coloured ones, because not all of them were the exact same size and shape. There are supposed to be rows of 4, but obviously my nails are not long enough for that. It doesn't matter though, this still works! I then used two strips of silver striping tape to emulate the 'neck' area that seperates the head from the lower body.


Overall I think this turned out pretty awesome! It was very fun to do. I wanted to do all of my nails but I do plan on wearing this manicure until the new episode airs and I think so many rhinestones on every nail would drive me crazy. :) So for now I will have two mini Daleks to keep me company!


And, ofcourse... how could I resist?

What do you think, did I nail it? And are you as excited for the new episode as I am?

Also check out some other Doctor Who inspired nail art here! :D

Tuesday, August 28, 2012

Pink manicure with rhinestones

A few weeks ago I decided that I wanted to try out a manicure with rhinestones, so I snooped around on eBay and purchased 3000 small nail art rhinestones in 12 different colours. They arrived yesterday and I went to make a manicure with them right away! As this was my first time ever using rhinestones, I went with something simple.


This is what I came up with, and I'm very happy with how it looks! I have to apologize for my dry skin. Every few weeks I do volunteering work at a local boarding kennel, and we have a new cleaning method... one that apparently is not nice at all for my nails and skin!

For the base I used Essence - Roy's Red from the Whoom! Boom! collection, and on top of that I placed one clear rhinestone on each nail using a toothpick and clear polish. I was surprised with how easy this was, because I have extremely shaky hands. It was very fun to do, so I'm already planning on some other manicures I can creature using my brand new rhinestones.


After putting the rhinestones on my nails I sealed them in with a layer of topcoat which for some reason made them a little 'matte', though not completely, as they are still shiny. I actually really like the look of it, so I don't mind. I'm curious to see how it will look with the other colours, though. :)


This is my little case of 12 different coloured types of rhinestones. They're all round and very tiny. I think it would be fun to get some differently shaped ones sometime. In case you're wondering, I purchased this case from the seller directsz on eBay for $2,06 which is dirt cheap! You'll have to be patient though, for me it took 20 days for them to get here.